Cài đặt và cấu hình Squid HTTP Proxy Server IPV6 trên CentOS7
Thịnh Văn Hạnh
29/11/2021
3362 Lượt xem
Chia sẻ bài viết
Bài viết này sẽ hướng dẫn cài đặt và cấu hình Squid HTTP Proxy Server IPV6 trên CentOS 7.

- Proxy server là máy chủ trung gian giữa client và server thực hiện nhiệm vụ chuyển dữ liệu giữa client với server.
- Ngay sau khi được yêu cầu thì proxy server sẽ kiểm tra bộ đệm của nó xem có dữ liệu trong đó, nó sẽ trả lại dữ liệu cho client, nếu không có trên bộ nhớ đệm, nó sẽ thực hiện yêu cầu thay cho client và gửi lại dữ liệu cho client.
- Ở đây người mọi người hay sử dụng proxy với mục đích fake IP hoặc ẩn giấu thông tin truy cập
Bước 1: Cài đặt Squid
yum install -y squid
# Stop firewallD
systemctl stop firewallD
Khởi động Squid
systemctl start squid
Cho phép squid khởi động cùng hệ thống
systemctl enable squid
Bước 2: Thiết lập cấu hình squid
vi /etc/squid/squid.conf
– Thêm nội dung sau vào file squid.conf
# Example rule allowing access from your local networks.
# Adapt to list your (internal) IP networks from where browsing
# should be allowed
acl localnet src 10.0.0.0/8 # RFC1918 possible internal network
acl localnet src 172.16.0.0/12 # RFC1918 possible internal network
acl localnet src 192.168.0.0/16 # RFC1918 possible internal network
acl localnet src fc00::/7 # RFC 4193 local private network range
acl localnet src fe80::/10 # RFC 4291 link-local (directly plugged) machines
acl localnet src x.x.x.x/24 # RFC1918 possible internal network
# Add rule
acl SSL_ports port 443
acl Safe_ports port 80 # http
acl Safe_ports port 21 # ftp
acl Safe_ports port 443 # https
acl Safe_ports port 70 # gopher
acl Safe_ports port 210 # wais
acl Safe_ports port 1025-65535 # unregistered ports
acl Safe_ports port 280 # http-mgmt
acl Safe_ports port 488 # gss-http
acl Safe_ports port 591 # filemaker
acl Safe_ports port 777 # multiling htt
acl CONNECT method CONNECT
forwarded_for off
# Hide client ip #
forwarded_for delete
# Turn off via header #
via off
####
acl portA localport 24000
# Map ports and IP addresses
tcp_outgoing_address 2403:6a40:0:88:bc26:ebff:fe1b:d5 portA
# Disable show ipv4
tcp_outgoing_address 127.0.0.1 portA
# Recommended minimum Access Permission configuration:
# Deny requests to certain unsafe ports
http_access deny !Safe_ports
# Deny CONNECT to other than secure SSL ports
http_access deny CONNECT !SSL_ports
# Only allow cachemgr access from localhost
http_access allow localhost manager
http_access deny manager
# We strongly recommend the following be uncommented to protect innocent
# web applications running on the proxy server who think the only
# one who can access services on "localhost" is a local user
http_access deny to_localhost
# INSERT YOUR OWN RULE(S) HERE TO ALLOW ACCESS FROM YOUR CLIENTS
#
auth_param basic program /usr/lib64/squid/basic_ncsa_auth /etc/squid/passwd
auth_param basic children 5
auth_param basic realm Squid Basic Authentication
auth_param basic credentialsttl 2 hours
acl auth_users proxy_auth REQUIRED
http_access allow auth_users
# Example rule allowing access from your local networks.
# Adapt localnet in the ACL section to list your (internal) IP networks
# from where browsing should be allowed
#http_access allow localnet
#http_access allow localhost
#http_access allow all
# And finally deny all other access to this proxy
#http_access deny all
# Squid normally listens to port 3128
http_port 3128
http_port 24000
# Uncomment and adjust the following to add a disk cache directory.
#cache_dir ufs /var/spool/squid 100 16 256
# Leave coredumps in the first cache dir
coredump_dir /var/spool/squid
#
# Add any of your own refresh_pattern entries above these.
#
refresh_pattern ^ftp: 1440 20% 10080
refresh_pattern ^gopher: 1440 0% 1440
refresh_pattern -i (/cgi-bin/|\?) 0 0% 0
refresh_pattern . 0 20% 4320
################################
Thực hiện chỉnh sửa các thông số sau:
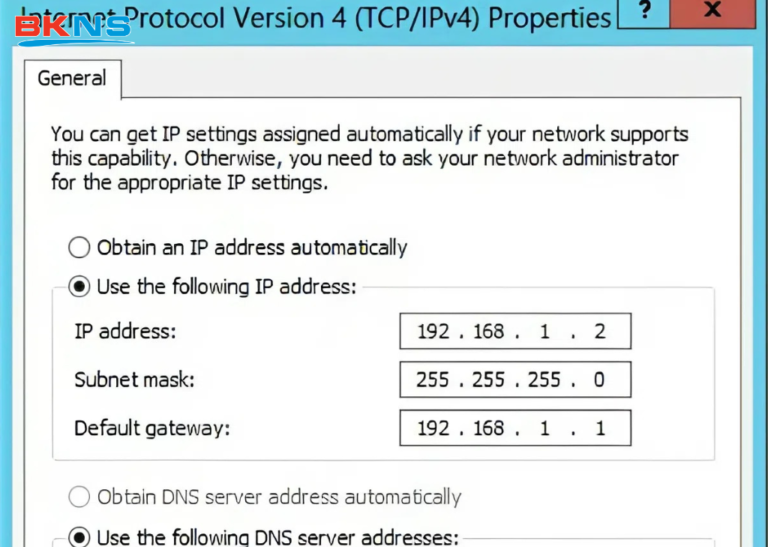
- acl localnet src x.x.x.x/24 # RFC1918 possible internal network (thay địa chỉ x.x.x.x sang ip wan mạng internet của bạn)
- Trường hợp muốn allow tất cả IP chỉnh sửa IP x.x.x.x/24 sang 0.0.0.0/24
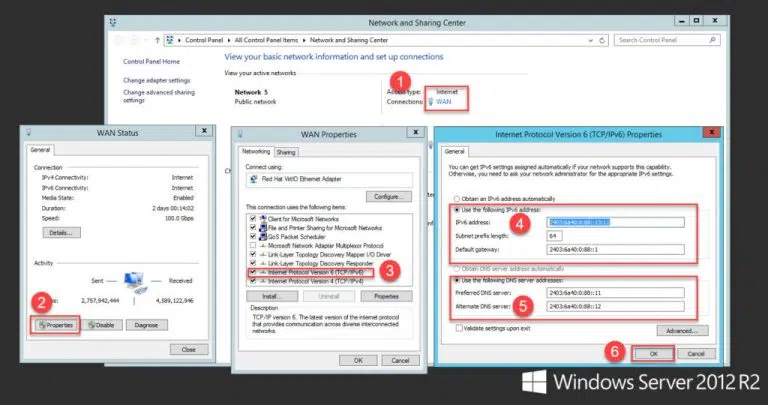
- tcp_outgoing_address 2403:6a40:0:88:bc26:ebff:fe1b:d5 portA (chỉnh sửa 2403:6a40:0:88:bc26:ebff:fe1b:d5 sang ipv6 của vps bạn đã cấu hình vào card mạng)
Bước 3 :Xác thực squid client authentication
yum -y install httpd-tools
touch /etc/squid/passwd
chown squid: /etc/squid/passwd
Tạo một user có tên bknsproxy và đặt password cho nó:
htpasswd /etc/squid/passwd bknsproxy
Khởi động lại squid server:
systemctl restart squid
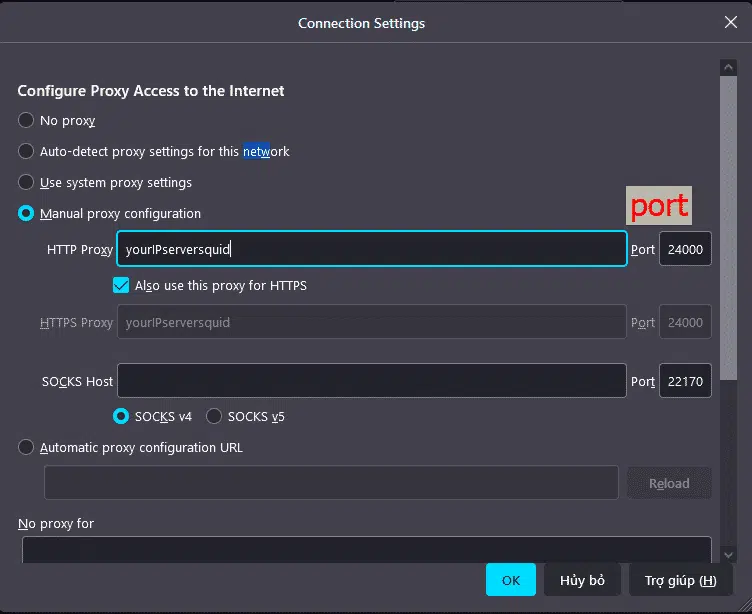
Bước 5: Cấu hình trình duyệt của bạn để sử dụng proxy
Ví dụ với trình duyệt Firefox
Các bước bên dưới giống nhau đối với Windows, macOS và Linux.
- Ở góc trên bên phải, nhấp vào biểu tượng bánh hamburger ☰ để mở menu của Firefox:
- Bấm vào ⚙ Preferences.
- Cuộn xuống phần Network Settings và nhấp vào nút Settings….
- Một cửa sổ mới sẽ mở ra.
– Chọn Manual proxy configuration.
– Nhập địa chỉ IP máy chủ Squid của bạn vào trường HTTP Host và 24000 trong trường Port.
– Chọn hộp kiểm Use this proxy server for all protocols.
– Bấm vào nút OK để lưu cài đặt.

Truy cập thử 1 website sẽ bắt đăng nhập. Hãy nhập user và password đã tạo ở bước 3

Truy cập trang https://whatismyipaddress.com/ xem ip đã thay đổi chưa.
Tới đây các bạn đã hoàn thành Cài đặt và cấu hình Squid HTTP Proxy Server IPV6 trên CentOS7.
Chúc các bạn thành công!
Linh BKNS


